
Good prepress file preparation takes time. In the era of digital design, prepress work looks deceptively easy. But making sure your files are print ready takes time to do well. Comps are now done with the look of final art. Gone are the charcoal, watercolor, and pencil art sketches that used to be used to present design concepts to clients. Now we are often likely to email or post a PDF of a concept to discuss on a conference call rather than we make a presentation board and present the concept in person. This can create a misperception.
Modern software tools give a finished, polished look to even the roughest ideas, which requires less imagination and make-believe to visualize the finished product. Because of these very polished preliminary drafts, it seems like the production of a final file once a concept has been approved should take only minutes — but it doesn’t.
Production
There are hours of work to take a digital concept to finished product. For example, we have a checklist with twenty-eight steps to produce a final 4-color print ad from an approved design. While none of this is the fun and creative part of the process, it is necessary to deliver a quality print-ready advertising file for production in a magazine or newspaper.
Our Prepress Checklist
Designer
- Size and crop all images in PhotoShop
- Merge all drop shadows with images; flatten layers
- Place images in document (encapsulated), not linked
- Spell check all text blocks
- Check text layer(s); make sure that all text is on non-art layers
- Check stroke and line weights on all elements (not text)
- Remove unused colors from color palette/swatches
- Check colors (CMYK, spot, spot conversions, grayscale)
- Save document copy for web-safe PDF production — needed for step 19
- Convert each text block to outlines
- Group each text block
- Check color of each text block for shift
- Set black text to overprint
- Create crop marks and bleed area
- Set document properties
- Save document as Creative Suite compatible file, EPS, and PDF
- Check EPS for color shift and layering problems (make sure that all type is visible, that there are no gradient replacements, and no loss of transparencies)
- Print proof with crop marks
- Open web-safe PDF from step 9 and create preview PDF, down-sampling images to 150 dpi or less
- Send 4 documents and placed images for proofing
Proofing
- Create copy of file for proofing
- Check file size dimensions, bleed area and safe area
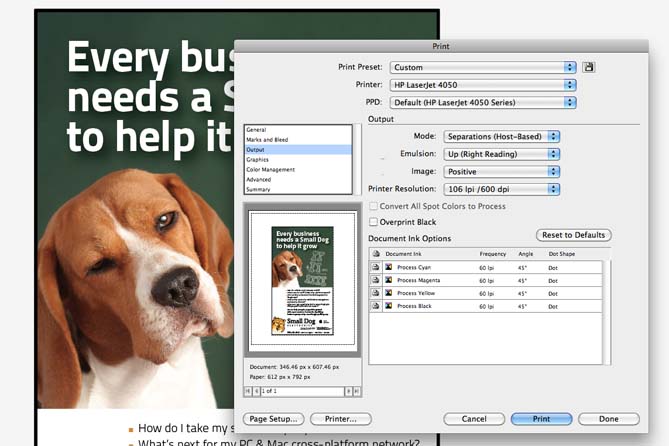
- Print color separations (check colors); proof each plate for inclusion elements against color proof provided by designer
• Type set to overprint
• Only correct color plates (no additional spot colors)
• No dropped elements
• Choke and trap set when required
• No transparent elements that may color shift
• No overprint light colors over dark - Proofread text backwards, comparing to text document or marked-up client approval copy
- Pre-flight images for resolution and size
- Compare color proof to client-approved printout for all elements
- Close file — DO NOT SAVE. If changes are needed, send notes to designer.
- If proof passed, package original file from designer for publication; traffic
Most of the steps in our checklist are simple and normal creative production workflow. Some are the result of experience earned on how to make a file most likely to be compatible for any print publication and reduce the risk of unintended color shifts and “drop outs”.
We also clearly separate the proofing from the design function. It’s important to have a set of “fresh eyes” view the files. Here’s a digital example of why making the time for separate proofing steps is important – we ran across this ad on a wind industry website.

